Troubleshooting
Off-grid PV systems are complex systems with many different components that must function together perfectly in order for the system to be able to provide power to end-users. An issue in the system design, installation or component manufacturing will typically not become apparent until the system begins to malfunction. Often times with simple off-grid PV systems an error is readily identified, like an energy storage system that is worn out in a system that was installed 5 years beforehand. Other times it can be quite complicated to identify what is causing the problem because an issue may only occur intermittently under certain exact conditions that must be identified or a problem may manifest itself in one component - like the inverter shutting down - but actually be the result of an energy storage system with a low voltage because the PV array is not functioning properly. It is important to understand all of the different components and consider how they interact as a system in order to properly perform a troubleshooting process. The complexity of an off-grid PV system and the fact that it is a system that involves electricity mean that any approach to identifying and solving a problem must be done systematically and with caution. A system that has an unidentified issue should be treated with extra precaution as the system has a failing component, installation error or a ground fault, which can create various unanticipated hazards.
- Ask questions of anyone who has been using the system: When did the issue start? What was the weather like around that time? How was the system being used when the issue first appeared - time of day? what lights/appliances were on? Had any changes been made to the system or had the way in which the system is used changed like a new appliance or adding a new circuit? Was the energy storage system depth of discharge (DoD) staying within appropriate guidelines recently?
- Before touching any part of the system, perform a visual inspection: Does everything look like it is properly connected and installed? Does anything appear burnt or smell strange? Has electrolyte spilled out of flooded lead acid batteries? Are any error or warning lights blinking on the equipment?
- Any system that is undergoing troubleshooting should follow safety guidelines and best practices outlined in Electrical safety. All people in the vicinity should be notified that you are beginning to work on the system and all power sources should be locked out and tagged out.
- Use a multimeter properly. When taking any measurements or evaluating any part of the system, it is vital to ask beforehand: what would be expected if the system were functioning properly? Compare the result that your result and consider carefully if the two vary.
- Methodically examine the system. Check different combinations of components and circuits. Disconnect particular circuits. Check components in isolation. Write down your results if it is a particularly complex system. This will help narrow down the component or circuit that is causing the issue.
- It is often necessary when troubleshooting to energize (turn on) certain parts of a system in order to be able to check voltages and if they are functioning properly in isolation. This should be done very carefully and only by someone who has sufficient knowledge and understanding of off-grid PV systems.
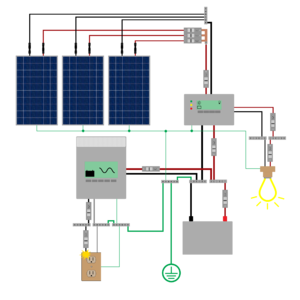
Example 1: See example image. The inverter for a system shut down unexpectedly. No overcurrent protection devices were activated. Every time the inverter is turned back on, it shuts down immediately. The inverter does not have a read-out screen to assist with error identification. How would you troubleshoot this system?
- Question system users: The response is that nothing has been out of the ordinary, that the system simply stopped functioning one evening.
- Visually inspect the system: There are no apparent issues.
- Notify everyone in the area of the need to troubleshoot the system. Properly secure all power sources.
- Check the energy storage system voltage. It is a 24V system, therefore the measured voltage should be above 23V if the system is functioning properly. The Measured voltage is 25V. A low voltage energy storage system is not likely to be the issue. This also means that the PV source and charge controller are likely functioning properly. The problem is likely with the inverter or circuits connected to the inverter.
- Disconnect all AC circuits from the inverter and attempt to turn it on. It works properly.
- 220V AC output is anticipated from the inverter and that is what is measured.
- Turn off the inverter and reconnect one circuit. Turn the inverter back on once the circuit is reconnected. It works properly.
- Turn off the inverter and reconnect a second circuit. Turn the inverter back on after the circuit is reconnected. The inverter turns off immediately. This circuit has some type of problem.
- Ensure the inverter is disconnected and that all Power source disconnects are open (turned off).
- Visually inspect the circuit that has issues. A rodent has chewed through the wire and created a ground fault that caused the inverter to have an error before the overcurrent protection devices identified an issue.
- Replace the damaged wire and test the system. The problem has been resolved.
