Difference between revisions of "Installing module connectors"
Jump to navigation
Jump to search
(Marked this version for translation) |
|||
| (2 intermediate revisions by the same user not shown) | |||
| Line 1: | Line 1: | ||
[[Category:System installation]] | [[Category:System installation]] | ||
| + | <languages /> | ||
| + | <translate> | ||
| − | All [[Module connectors|PV module connectors]] are designed to be easily snapped together, but to require a tool to disconnect the connection once made. The steps for installing an MC4 connector on a wire are as follows: | + | <!--T:1--> |
| + | All [[Special:MyLanguage/Module connectors|PV module connectors]] are designed to be easily snapped together, but to require a tool to disconnect the connection once made. The steps for installing an MC4 connector on a wire are as follows: | ||
#Ensure that the connector is the right connector type. | #Ensure that the connector is the right connector type. | ||
#Ensure that the connector is the right size for the wire. | #Ensure that the connector is the right size for the wire. | ||
| − | #Ensure that the connector is the proper [[ | + | #Ensure that the connector is the proper [[Special:MyLanguage/Electricity types|polarity]] for the connection. Positive plastic MC4 connectors (male) insert into negative plastic MC4 connectors (female). |
#For each MC4 connector there is a metallic connector that must be crimped onto the wire before it is inserted into the plastic body of the connector. Inside the positive plastic MC4 connector (male) there is a female metallic part. Inside the negative plastic MC4 connector (female) there is a male metallic part. | #For each MC4 connector there is a metallic connector that must be crimped onto the wire before it is inserted into the plastic body of the connector. Inside the positive plastic MC4 connector (male) there is a female metallic part. Inside the negative plastic MC4 connector (female) there is a male metallic part. | ||
#Strip back the wire enough to fit into the crimped section of the metallic connector. | #Strip back the wire enough to fit into the crimped section of the metallic connector. | ||
| Line 12: | Line 15: | ||
#Tighten the bushing on the back of the connector to ensure that it is water-tight using the plastic MC4 tools. | #Tighten the bushing on the back of the connector to ensure that it is water-tight using the plastic MC4 tools. | ||
| + | <!--T:2--> | ||
<gallery widths=250px> | <gallery widths=250px> | ||
File:Mc4connector.png|Positive and negative MC4 connectors with inside metal parts. The wires have not been crimped in the graphic. | File:Mc4connector.png|Positive and negative MC4 connectors with inside metal parts. The wires have not been crimped in the graphic. | ||
File:Mc4tools201106.png|'''(1)''' Plastic tool for disconnecting and tightening MC4 connectors. '''(2)''' MC4 crimper with various different crimping dies. | File:Mc4tools201106.png|'''(1)''' Plastic tool for disconnecting and tightening MC4 connectors. '''(2)''' MC4 crimper with various different crimping dies. | ||
</gallery> | </gallery> | ||
| + | |||
| + | ==Notes/references== <!--T:3--> | ||
| + | </translate> | ||
Latest revision as of 18:21, 7 March 2021
All PV module connectors are designed to be easily snapped together, but to require a tool to disconnect the connection once made. The steps for installing an MC4 connector on a wire are as follows:
- Ensure that the connector is the right connector type.
- Ensure that the connector is the right size for the wire.
- Ensure that the connector is the proper polarity for the connection. Positive plastic MC4 connectors (male) insert into negative plastic MC4 connectors (female).
- For each MC4 connector there is a metallic connector that must be crimped onto the wire before it is inserted into the plastic body of the connector. Inside the positive plastic MC4 connector (male) there is a female metallic part. Inside the negative plastic MC4 connector (female) there is a male metallic part.
- Strip back the wire enough to fit into the crimped section of the metallic connector.
- MC4 crimpers have different size crimping dies, select the appropriate size for the wire.
- Crimp the metallic connector around the wire.
- Insert the wire and connector into the plastic body of the correct MC4 connector.
- Tighten the bushing on the back of the connector to ensure that it is water-tight using the plastic MC4 tools.
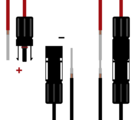
Positive and negative MC4 connectors with inside metal parts. The wires have not been crimped in the graphic.

(1) Plastic tool for disconnecting and tightening MC4 connectors. (2) MC4 crimper with various different crimping dies.

