Difference between revisions of "PV source and charge controller sizing and selection overview"
Jump to navigation
Jump to search
(Marked this version for translation) |
|||
| Line 2: | Line 2: | ||
<languages /> | <languages /> | ||
<translate> | <translate> | ||
| + | <!--T:1--> | ||
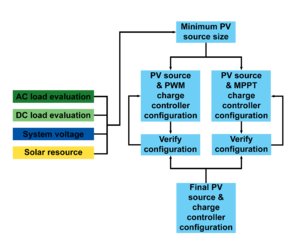
[[File:PVandCCprocess.png|thumb|A flowchart depicting the primary inputs and outputs of the PV source and charge controller sizing and selection process. The arrow returning from the ''verify configuration'' boxes means that the configuration must be reconsidered if it fails the verification process.]] | [[File:PVandCCprocess.png|thumb|A flowchart depicting the primary inputs and outputs of the PV source and charge controller sizing and selection process. The arrow returning from the ''verify configuration'' boxes means that the configuration must be reconsidered if it fails the verification process.]] | ||
| + | <!--T:2--> | ||
The most complicated part of the design process involves sizing and configuring the [[Special:MyLanguage/PV module|PV source]] as it must be done in conjunction with the sizing and selection of the [[Special:MyLanguage/Charge controller|charge controller]]. This process may need to be performed various times until the ideal design is found for the project, but going through this process will becomes simpler with each subsquent design. There are many different design parameters in this process for which conservative values and appropriate values from component specifications sheets should be used. | The most complicated part of the design process involves sizing and configuring the [[Special:MyLanguage/PV module|PV source]] as it must be done in conjunction with the sizing and selection of the [[Special:MyLanguage/Charge controller|charge controller]]. This process may need to be performed various times until the ideal design is found for the project, but going through this process will becomes simpler with each subsquent design. There are many different design parameters in this process for which conservative values and appropriate values from component specifications sheets should be used. | ||
| + | <!--T:3--> | ||
The main inputs to this process are: | The main inputs to this process are: | ||
| + | <!--T:4--> | ||
#'''[[Special:MyLanguage/Load and solar resource comparison|DC load evaluation]]''' - included in average daily Watt-hours required for the design month and used to size the PV source. | #'''[[Special:MyLanguage/Load and solar resource comparison|DC load evaluation]]''' - included in average daily Watt-hours required for the design month and used to size the PV source. | ||
#'''[[Special:MyLanguage/Load and solar resource comparison|AC load evaluation]]''' - included in average daily Watt-hours required for the design month and used to size the PV source. | #'''[[Special:MyLanguage/Load and solar resource comparison|AC load evaluation]]''' - included in average daily Watt-hours required for the design month and used to size the PV source. | ||
| Line 13: | Line 17: | ||
#'''[[Special:MyLanguage/Load and solar resource comparison|Solar resource]]''' - used to determine required PV source size to meet daily energy needs. | #'''[[Special:MyLanguage/Load and solar resource comparison|Solar resource]]''' - used to determine required PV source size to meet daily energy needs. | ||
| + | <!--T:5--> | ||
The primary steps in the process are: | The primary steps in the process are: | ||
| + | <!--T:6--> | ||
#Determine [[Special:MyLanguage/Minimum PV source size|minimum PV source size]] | #Determine [[Special:MyLanguage/Minimum PV source size|minimum PV source size]] | ||
#Choose a charge controller type: [[Special:MyLanguage/MPPT charge controller sizing and selection|MPPT charge controller sizing and selection]] or [[Special:MyLanguage/PWM charge controller sizing and selection|PWM charge controller sizing and selection]]. | #Choose a charge controller type: [[Special:MyLanguage/MPPT charge controller sizing and selection|MPPT charge controller sizing and selection]] or [[Special:MyLanguage/PWM charge controller sizing and selection|PWM charge controller sizing and selection]]. | ||
| Line 23: | Line 29: | ||
#Determine a final charge controller and PV module configuration that is the best balance between performance and cost. | #Determine a final charge controller and PV module configuration that is the best balance between performance and cost. | ||
| − | ==Notes/references== | + | ==Notes/references== <!--T:7--> |
</translate> | </translate> | ||
Revision as of 17:04, 1 April 2021
The most complicated part of the design process involves sizing and configuring the PV source as it must be done in conjunction with the sizing and selection of the charge controller. This process may need to be performed various times until the ideal design is found for the project, but going through this process will becomes simpler with each subsquent design. There are many different design parameters in this process for which conservative values and appropriate values from component specifications sheets should be used.
The main inputs to this process are:
- DC load evaluation - included in average daily Watt-hours required for the design month and used to size the PV source.
- AC load evaluation - included in average daily Watt-hours required for the design month and used to size the PV source.
- Special:MyLanguage/DC system voltage - used to determine potential PV module and charge controller configurations.
- Solar resource - used to determine required PV source size to meet daily energy needs.
The primary steps in the process are:
- Determine minimum PV source size
- Choose a charge controller type: MPPT charge controller sizing and selection or PWM charge controller sizing and selection.
- Choose a module size.
- Create a charge controller and PV source (series and parallel) configuration.
- Verify that the charge controller and PV source combination will function well.
- If the charge controller and PV module configuration is not a good design, then restart with a different combination.
- Determine a final charge controller and PV module configuration that is the best balance between performance and cost.
